Giles Gaskell, Nvision Inc.
Military hardware is aging fast. In some cases, it's older than the soldiers who use it. Spare parts are required to keep this equipment running, but many of the companies that supplied them have long left the business, and drawings and documentation may no longer exist. Reverse-engineering firms have stepped in to re-create the parts using the latest computerized numerical control machinery, and laser scanning systems offer them performance benefits.

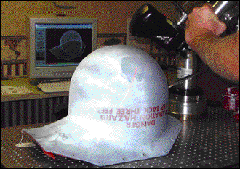
A laser scanning system captures the dimensions of a radome for an SH-60 Seahawk helicopter.
One approach to reverse engineering is to use a coordinate measuring machine to produce a model of a new or used part. The machine employs motors operating through ball screws to provide three axes of linear motion. The operator moves the probe to a point that he or she wishes to measure, and rotary encoders determine the position of each axis with a high degree of accuracy.
This method offers some positive results, but it is not without its drawbacks. The primary limitation of a coordinate measuring machine is that it captures points one at a time, so the operator must manually move the steering system to track each point to be measured. To accurately model the geometry of a complex 3-D contour, which is the case with many military parts, millions of points may be required. Generating them with a coordinate measuring machine can take months.
Moreover, the end result of a scan with a contact device is a series of sections, rather than a surface. Although methods of generating surfaces from the sections work well enough with simple surfaces, they are not effective for complex shapes.
Reverse-engineering firm Radian Milparts of Eastlake, Ohio, turned to laser scanning. Using the ModelMaker laser scanner from system integrator Nvision Inc. of Southlake, Texas, along with a coordinate measuring machine, an operator at Radian Milparts can switch from scanning contours to capturing individual points with the push of a button.
Laser scanning systems work by projecting a line of laser light onto a surface to be measured while a camera continuously triangulates the changing distance and profile of the line as it sweeps over the object. A computer translates the video image of the line into 3-D coordinates, providing real-time data renderings that offer the operator immediate feedback on areas that might have been missed. The systems quickly measure large parts while generating far greater numbers of data points than probes can, without the need for templates or fixtures. Because there is no contact tip, the problems of depressing soft objects, measuring small details and capturing complex free-form surfaces are eliminated.
The scanner comprises a laser and a camera mounted in a small handheld unit -- the head. This is mounted on a localizer, or the arm, which consists of composite links joined by seven precision axial encoders that ensure that the position of the head is known at all times. The shape of the object that is being scanned is defined by combining what the camera sees with the positional information from the arm.
In the reverse-engineering application, a technician moves the scanner around the object in a manner similar to spray painting. The data is sent to software to convert the point cloud into a surface model that can be imported into computer-aided design software.
The resulting model serves as the basis of a technical data package for the part, and the company sends the package out for bid to contract manufacturers. The winning bidder uses the 3-D model to generate a computerized numerical control program that either produces the finished part or that builds a mold for casting it.
ModelMaker's head, which is manufactured by 3D Scanners Ltd. in London, incorporates an eye-safe laser that produces a red stripe of light, similar to that used in supermarket scanners. The camera measures 760 points in a line at 30 stripes per second, resulting in a measuring rate of approximately 23,000 points per second. The scanner is available with three stripe widths: 35, 70 and 140 mm. The larger stripe covers a greater area in a given time, making it suitable for use with objects as large as entire vehicles. The narrower stripe produces a finer resolution between points, increasing the accuracy on fine details.
The key advantage of laser scanning is that it generates far more data points in less time than other approaches. Depending on the size of the part and the level of accuracy required, a reverse-engineering company typically captures tens of millions of points for each part. The technology thus enables not only a faster result, but also a more accurate representation of the part than would have been possible with conventional methods, however much time had been spent collecting the data.