Hank Hogan
For those who need a ruler with exceedingly fine gradation, physicist John R. Lawall of the National Institute of Standards and Technology (NIST) in Gaithersburg, Md., has the tool for you. He has developed a technique that can measure distances of up to 50 mm with an absolute accuracy of better than 10 pm, a relative uncertainty of 0.4 parts per billion. The technique, which is based on Fabry-Perot methods, is unlike other interferometric approaches in that it does not need a reference beam to determine changes in mechanical length.

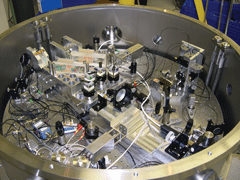
To offer a measurement accuracy of 0.4 parts per billion, the setup is mechanically isolated and housed in a vacuum to minimize disturbances. Courtesy of National Institute of Standards and Technology.
What’s more, he noted, there is no need to continuously probe the Fabry-Perot cavity with a beam. “This can all be done even if the laser beam is interrupted,” he said.
In Fabry-Perot interferometry, a beam traversing a partially reflecting cavity interferes with itself as it bounces back and forth. The result is that light is transmitted when the cavity length is an integral multiple of half the wavelength of the light. By locking a tunable laser to a cavity resonance, it is possible to monitor changes in the cavity length by tracking changes in the laser frequency.

Frequency shifts
Lawall’s innovation is built upon a decades-old insight by Zoltan Bay of what is now NIST. When the length of a Fabry-Perot cavity changes, the shift in its resonant frequency is accompanied by a shift in the difference between the adjacent resonant frequencies. That change in spacing can provide an absolute measure of cavity length, which is not possible with a single resonant frequency. Of further benefit, the technique does not need to constantly interrogate the cavity, and it works even if the beam is occasionally interrupted.
In building a demonstration system, Lawall employed two lasers. The first, an iodine-stabilized HeNe at 633 nm, provides a standard for measuring the frequency of the other beam. The second beam is split in two, and each half is sent through a separate acousto-optic modulator. These are adjusted so that one is at a resonant mode of N half-wavelengths while the other is at an adjacent mode, N-1.
From the measured difference between the resonant frequencies, Lawall computed the absolute size of the cavity with a high degree of precision. By using the difference and the absolute frequencies, he measured changes with even higher accuracy. All told, he sent six frequencies of laser light down one fiber and into the test cavity, which was mechanically isolated and in a vacuum to minimize disturbances.
He recalled that, before he built and operated the prototype, he was not sure that this would work because of mechanical and thermal fluctuations in the fiber. In the end, however, it did.
As for applications, he believes that these will be in specialized areas requiring ultrahigh-accuracy displacement measurements. Most will be in national standards laboratories, but it is possible that the approach will be used in demanding industrial applications, he said.